Learn how to make perfectly crunchy and briny homemade sauerkraut. This recipe has been passed down through generations; it’s healthy and very simple to prepare.
Making homemade sauerkraut is a right of passage, especially if you are of Slavic heritage. It was something that was passed down from generation to generation. Now that we are in the cool modern age, it isn’t as popular as it was in the days of our ancestors, but it seems to be having a comeback. Now that we have more and more research proving how many incredible health benefits fermented foods have on our bodies, I think more and more people will discover how delicious it is and how easy it is to make.
I grew up eating sauerkraut since I first learned to chew and have watched my mother and my grandmothers go through the mesmerizing process to make it every year, especially in the fall. I think my Mom makes the best sauerkraut I have tasted anywhere, so I wanted to learn every trick that she uses to make it exactly like her. Picture me taking notes while on the phone with her, over the many miles separating us, exactly what kind of cabbage to use, how much salt and sugar to add and every other little detail that is involved in the process. Today, I am sharing all the tips and tricks I’ve learned over the years. The sauerkraut turns out perfectly salty, briny and crisp, not soggy at all. It stays perfectly crunchy and briny for months. If you love sauerkraut, I hope you give this a try.
Ingredients:
1 large cabbage head
1 large carrot, shredded
3/4 – 1 Tablespoon salt
1/2 Tablespoon sugar
Instructions:
What is the Best Cabbage to Use For Sauerkraut
The best cabbage to use for sauerkraut is lighter in color, almost white, not vividly green.
Typically, young cabbage, usually sold in the spring, is bright green in color, and older cabbage, white in color, is sold in the autumn.
Green cabbage does not release as much juicer as the white cabbage does. Cabbage juice is one of the most important things for a great sauerkraut. All of the shredded cabbage needs to be completely submerged in the salty cabbage juice, which becomes a brine for the cabbage.
Making the Sauerkraut
Start with shredding the cabbage. You can either do this with a sharp knife, or use a mandolin. A mandolin is much faster, however, it is EXTREMELY SHARP. Be very careful. You have been warned.
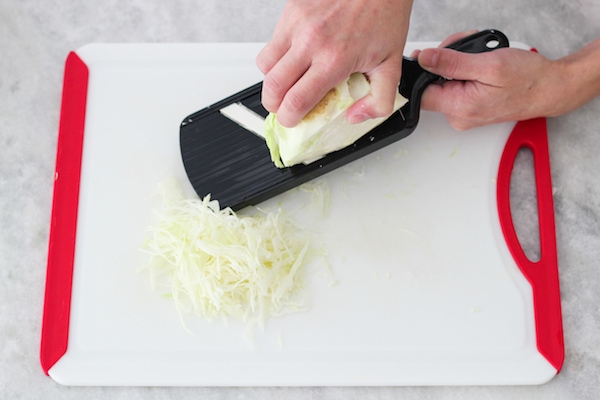 I absolutely love this unassuming, very simple mandolin* that I’ve owned for about 7 years now. It is so small, easy to store and works phenomenally well. You can adjust how thin you want your slices to be too.
I also grate the carrots on a fine julienne slicer.*
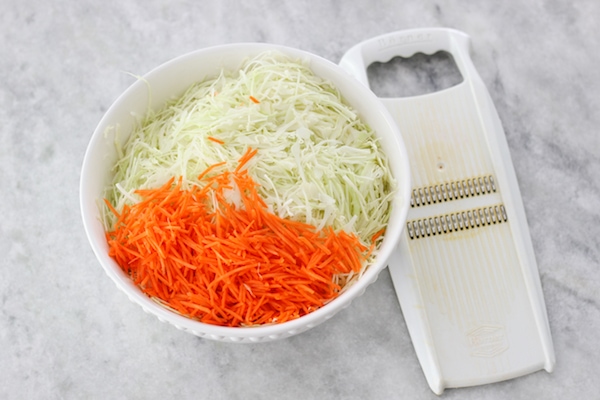 In a large bowl, mix the cabbage, carrots, salt and sugar. If I’m using a large cabbage head, I use a full Tablespoon of salt. If I’m using a small cabbage head, I use a little less than a Tablespoon of salt.
Using both hands, aggressively scrunch up the cabbage and carrot, for at least 5 minutes, until it releases a lot of liquid. It should completely cover all of the cabbage. 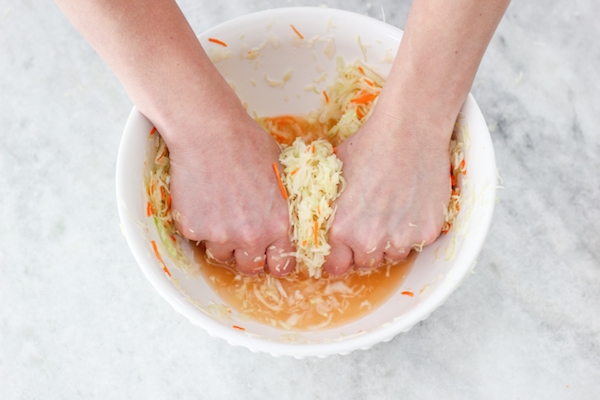 If you don’t have a lot of strength in your arms and the cabbage isn’t releasing enough liquid, ask your husband, brother, sister, etc to help. If you’re making a huge batch of sauerkraut, you will probably want to switch up with someone else anyway. Back in the day when making sauerkraut in the fall to last all year long was a common activity for most families, children would be given the job to stomp on the cabbage with their clean little feet:). You don’t need to resort to getting your children to dance on top of your cabbage, but it sure is a fun thing to keep in the back of your mind.
The cabbage mixture should feel and look wet.  When you press down on it, all of the liquid should cover the cabbage liberally.
  In regards to the salt – I always taste a bit of the cabbage when I’m done scrunching it. You should be able to taste the salt. Remember that when the cabbage brines, it will get a more tart flavor and will dilute the salt a bit, so I aim to make the cabbage just a bit saltier than I think it should be and when it becomes sauerkraut, it is perfect.
Fermenting the Sauerkraut
At this point, you can keep the cabbage in a large bowl, or transfer it to a glass jar. I usually keep it in the bowl, because it’s easier for me to put a weight on top of the cabbage to make sure it stays submerged the entire time it’s fermenting.
I usually put a plate on top of the cabbage (or an extra cabbage leaf) and then place something heavy on top of it, like a large can of tomatoes, a jar filled with water. 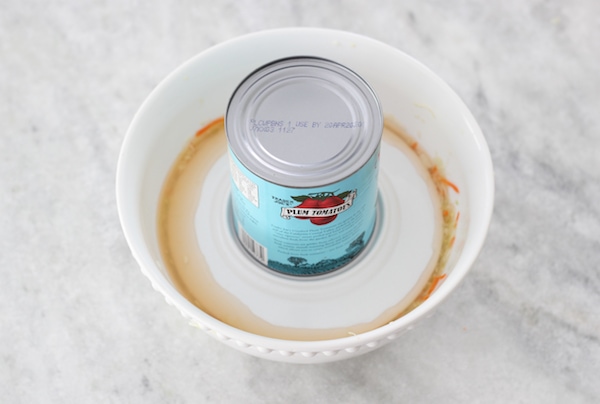 As the sauerkraut ferments, it will increase in size, so make sure to use a bowl with plenty of extra room at the top. Then, I cover the bowl with several layers of plastic wrap (as the cabbage is fermenting, it will have a very strong “cabbagy” odor).
Keep the sauerkraut at room temperature for about 3 days. Each day, use the end of a wooden spoon to poke several holes all the way through the sauerkraut, to release some of the built up “gas”. Make sure the cabbage is submerged for the entire 3 days. At this point, when you taste the cabbage, it should taste like sauerkraut. If it still doesn’t taste briny, let it stand for another day or two.
Storing Sauerkraut
Transfer the sauerkraut to a glass jar and store in the refrigerator. I usually use a 64 oz jar, and it is about 3/4 full with sauerkraut from one large cabbage head. 
Serving the Sauerkraut and Using It In Other Recipes
Sauerkraut is wonderful to use in many recipes. One of my favorite soups is Shchi With Dry Mushrooms. It’s also great with roasted chicken and potatoes, or sausage. (Who would like a recipe for those?) I also add it to salads, such as Beet Vinegret Salad.
When I’m serving the sauerkraut on the side, I like to add some salt, freshly ground black pepper, sunflower oil, thinly sliced or finely minced red onion, dill seeds, and fresh herbs, like green onion and dill. Sometimes, I also add a thinly sliced apple to it for a bit of sweetness. 

Description
Learn how to make perfectly crunchy and briny homemade sauerkraut. This recipe has been passed down through generations; it’s healthy and very simple to prepare.
Ingredients
- 1 large cabbage head
- 1 large carrot, shredded
- 3/4 – 1 Tablespoon salt
- 1/2 Tablespoon sugar
Instructions
- The best cabbage to use for sauerkraut is lighter in color, almost white, not vividly green.
- Typically, young cabbage, usually sold in the spring, is bright green in color, and older cabbage, white in color, is sold in the autumn.
- Green cabbage does not release as much juicer as the white cabbage does. Cabbage juice is one of the most important things for a great sauerkraut. All of the shredded cabbage needs to be completely submerged in the salty cabbage juice, which becomes a brine for the cabbage.
- Start with shredding the cabbage. You can either do this with a sharp knife, or use a mandolin. A mandolin is much faster, however, it is EXTREMELY SHARP. Be very careful. You have been warned.
- Grate the carrots on a fine julienne slicer or a box grater.
- In a large bowl, mix the cabbage, carrots, salt and sugar. If I’m using a large cabbage head, I use a full Tablespoon of salt. If I’m using a small cabbage head, I use a little less than a Tablespoon of salt.
- Using both hands, aggressively scrunch up the cabbage and carrot, for at least 5 minutes, until it releases a lot of liquid. It should completely cover all of the cabbage.
- The cabbage mixture should feel and look wet. When you press down on it, all of the liquid should cover the cabbage liberally. In regards to the salt – I always taste a bit of the cabbage when I’m done scrunching it. You should be able to taste the salt. Remember that when the cabbage brines, it will get a more tart flavor and will dilute the salt a bit, so I aim to make the cabbage just a bit saltier than I think it should be and when it becomes sauerkraut, it is perfect.
- At this point, you can keep the cabbage in a large bowl, or transfer it to a glass jar. I usually keep it in the bowl, because it’s easier for me to put a weight on top of the cabbage to make sure it stays submerged the entire time it’s fermenting.
- Put a weight on top of the cabbage – a plate on top of the cabbage, or an extra cabbage leaf and then something heavy on top of it, like a large can of tomatoes, or a jar filled with water work really well. As the sauerkraut ferments, it will increase in size, so make sure to use a bowl with plenty of extra room at the top. Then, cover the bowl with several layers of plastic wrap (as the cabbage is fermenting, it will have a very strong “cabbagy” odor).
- Keep the sauerkraut at room temperature for about 3 days. Each day, use the end of a wooden spoon to poke several holes all the way through the sauerkraut, to release some of the built up “gas”. Make sure the cabbage is submerged for the entire 3 days.
- At this point, when you taste the cabbage, it should taste like sauerkraut. If it still doesn’t taste briny, let it stand for another day or two.
- Transfer the sauerkraut to a glass jar and store in the refrigerator.
- When I’m serving the sauerkraut on the side, I like to add some salt, freshly ground black pepper, sunflower oil, thinly sliced or finely minced red onion, dill seeds, and fresh herbs, like green onion and dill. Sometimes, I also add a thinly sliced apple to it for a bit of sweetness.
Keywords: homemade sauerkraut, how to make sauerkraut, cabbage, fermenting cabbage
*affiliate links – This is NOT a sponsored post. Some of the links may be affiliate links.
The post How To Make Homemade Sauerkraut appeared first on Olga's Flavor Factory.